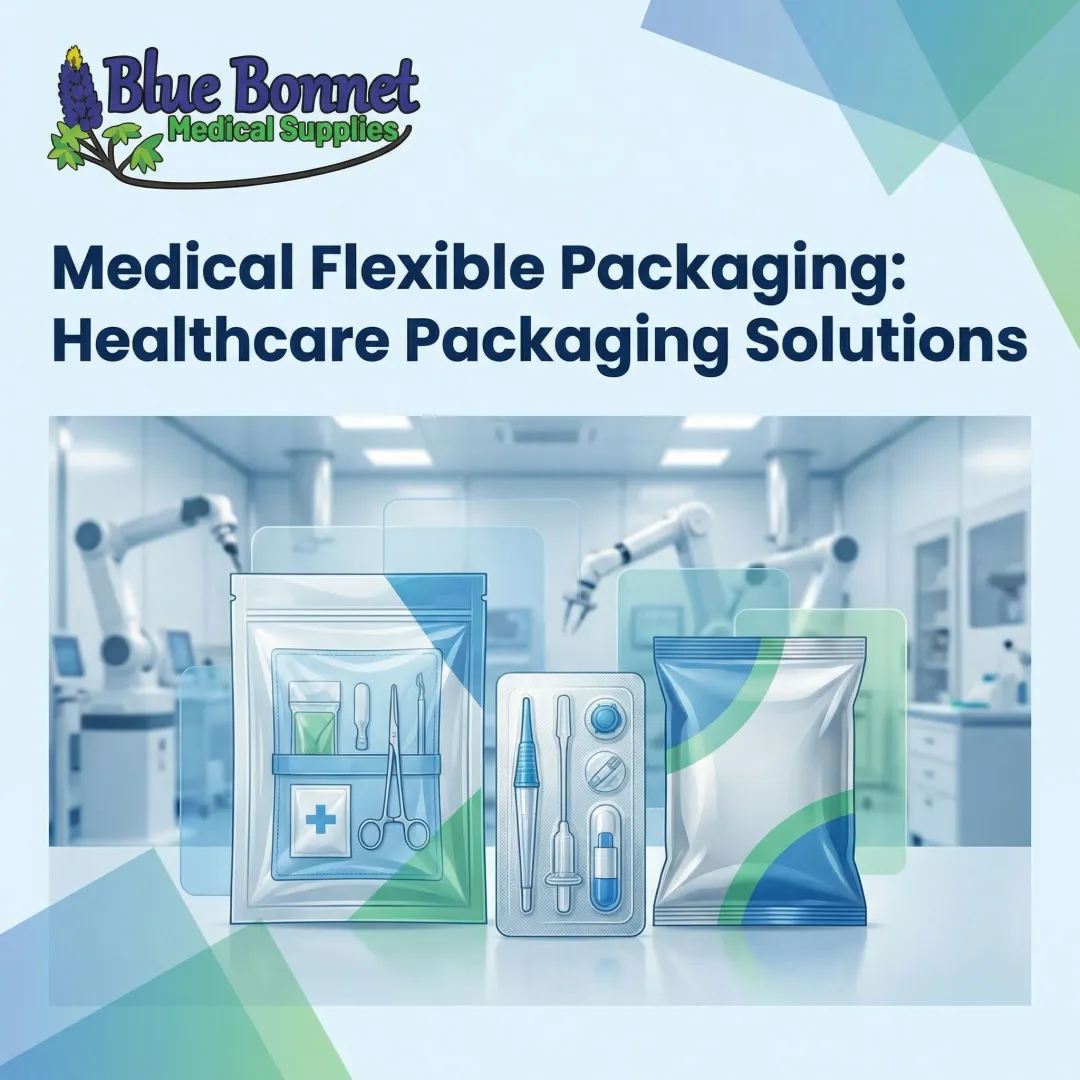
Introduction
A single breach in sterilization packaging can compromise an otherwise sterile instrument and create a direct patient infection risk. The CDC estimates 110,800 SSIs occur annually in inpatient settings, representing 20% of all healthcare-associated infections. They also carry a 2- to 11-fold increase in mortality risk. In sterile processing departments (SPDs), the pouch is often the last line of defense between a clean instrument and a surgical site.
Understanding how pouches work—and where they can fail—is what makes the difference between maintaining that barrier and losing it. This guide covers pouch types, proper use and selection, and the compliance standards that govern them, written for SPD professionals, perioperative staff, and medical supply businesses.
TLDR
- Sterilization pouches are single-use, FDA-cleared Class II medical devices that allow sterilant penetration and maintain sterility after processing
- Paper/plastic pouches suit steam and EO sterilization; Tyvek/plastic pouches suit VHP and EO — matching pouch type to sterilization method is non-negotiable
- Three designs exist: self-seal, heat-seal, and cut-to-size rolls, each with tradeoffs in speed, cost, and seal confidence
- Proper sizing requires at least 1 inch of space around the item and filling the pouch to no more than 75% capacity
- Sterility is event-related: a torn seal, wet packaging, or compromised barrier means the item is no longer sterile, regardless of how recently it was processed
What Are Sterilization Pouches and Why They Matter in Sterile Processing
A sterilization pouch—also called a peel pack or peel pouch—is a disposable, single-use packaging system used in a sterilizer to permit sterilant penetration to the contents inside. After sterilization, the pouch maintains the sterility of the processed item until it is opened for use. Pouches serve as the primary sterile barrier system (SBS) for lightweight, low-profile reusable instruments such as scissors, forceps, and clamps.
Regulatory Classification
Sterilization pouches are classified as Class II Medical Devices by the FDA under 21 CFR 880.6850. They require 510(k) premarket clearance and must be validated for use in specific sterilizers and sterilization cycles. This means pouches are not generic commodity packaging—they are regulated devices with performance requirements defined by ISO 11607 and ANSI/AAMI ST79.
Role in the SPD Workflow
Sterilization pouches are used primarily for:
- Lightweight, low-profile reusable instruments
- Backup instruments with limited inventory
- Specialty items sent from kitting facilities to clinics
- Instruments requiring aseptic presentation in the OR
Pouches are designed for one-time use only. Any pouch showing defects, tears, or damage must be discarded immediately — reuse violates FDA device labeling and reintroduces cross-contamination risk at the point of care.
How Pouches Fit Into the Full Sterilization Chain
Sterilization pouches do not work in isolation. The package is only as reliable as the cleaning, drying, sealing, and storage steps that surround it. A seal failure or improper pouch selection doesn't just mean a packaging problem — it means a contaminated instrument reaches the sterile field, undoing every step that came before it.
Types of Sterilization Pouches and Their Materials
Two Core Material Combinations
Sterilization pouches come in two primary material types, each validated for specific sterilization methods:
Paper/Plastic Pouches
- Suitable for steam sterilization and Ethylene Oxide (EO)
- One side is clear plastic film for instrument visibility
- The other side is medical-grade paper that allows sterilant penetration
Tyvek/Plastic Pouches
- Suitable for Vaporized Hydrogen Peroxide (VHP/STERRAD) and EO
- One side is clear plastic film
- The other side is Tyvek, a synthetic material that resists moisture absorption
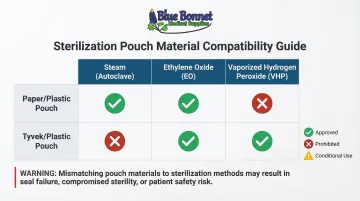
Critical Compatibility Warning
Using the wrong pouch in the wrong sterilizer is a failure point:
- Tyvek placed in a steam sterilizer will melt at high temperatures unless specifically validated for controlled steam conditions (250°F to 260°F at 30 psi for 30 minutes)
- Paper placed in VHP sterilization will absorb the sterilant vapor, preventing it from reaching the device, damaging instruments, and creating a fire hazard
The CDC explicitly prohibits cellulosic materials (paper, linens) in hydrogen peroxide gas plasma sterilizers because paper neutralizes the sterilant and causes cycle cancellations.
Pouch Material vs. Validated Sterilization Methods
| Pouch Material | Steam (Autoclave) | Ethylene Oxide (EO) | Vaporized Hydrogen Peroxide (VHP) |
|---|---|---|---|
| Paper/Plastic | Approved | Approved | Prohibited (absorbs sterilant) |
| Tyvek/Plastic | Conditional (only if validated) | Approved | Approved |
Beyond material type, the physical format of a pouch affects workflow speed, equipment requirements, and sealing reliability. Three options are available:
Three Pouch Format Options
Self-Seal Pouches
- Feature an adhesive strip on one end
- Faster to use; no equipment required
- Demand careful technique to avoid gaps in the seal
Heat-Seal Pouches
- Require a heat sealer machine with warm-up time and validation
- Produce a pressed, flat seam with greater seal integrity
- Better choice when consistent, high-volume sealing is needed
Cut-to-Size Rolls (Tubing)
- Technician cuts to the desired length and heat-seals both ends
- Most flexible option for varying instrument sizes
- Requires heat sealer equipment; the only format available in roll form
How to Use Sterilization Pouches: Step-by-Step Process
Step 1 — Pre-Packaging Preparation
Instruments must be fully decontaminated, cleaned, rinsed, and completely dried before being placed in a pouch. Items should be visually free of soil and debris. Hinged instruments should be open, and multi-part items should be disassembled unless the device IFU specifies otherwise.
Step 2 — Packaging the Instrument
Select the correct pouch material for your sterilization method, then choose the correct size. Per ANSI/AAMI ST79 guidelines:
- Leave at least 1 inch of space around the item on all sides
- Fill the pouch to no more than 75% of its packing volume
- Place a chemical indicator inside the pouch before sealing
Skipping any of these steps risks sterilization failure — air pockets and overfilled pouches are leading causes of inadequate sterilant penetration.
Step 3 — Sealing the Pouch
Follow the manufacturer's IFU for the specific sealing method:
For self-seal pouches:
- Ensure the adhesive strip makes complete contact with no gaps or bubbles
- Smooth the seal firmly along its entire length
For heat-seal pouches:
- Confirm the machine has reached proper temperature
- Verify seal completeness using recommended validation tools such as tape or dye
- Label the sealed pouch with relevant information before transport
Step 4 — Loading the Sterilizer
Proper pouch orientation is critical for even sterilant contact and drying. Follow these loading guidelines:
- Place pouches on their edge (not flat), facing the same direction
- Alternate paper or Tyvek to plastic throughout the load
- Use purpose-built racks and space pouches to allow sterilant circulation
- Confirm the pouch and device are validated for the chosen sterilizer and cycle per IFU
Step 5 — Double Pouching and Aseptic Presentation
Double pouching is not mandated by AAMI or AORN guidelines, but some facilities use it for instruments that are difficult to present aseptically in the OR. When double pouching:
- Place the inner pouch inside the outer with film-to-film orientation (plastic faces plastic, paper faces paper)
- Do not fold the inner pouch
- Verify the pouch IFU supports double pouching before doing so
After sterilization, train OR staff on proper aseptic peel technique to avoid contaminating the instrument on presentation.

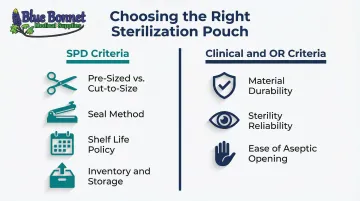
How to Choose the Right Sterilization Pouch for Your Facility
SPD Selection Criteria
1. Pre-Sized vs. Cut-to-Size
- High-volume SPDs benefit from the speed and consistency of pre-sized pouches
- Space-limited departments often prefer cut-to-size rolls for flexibility across instrument types
2. Seal Method
- Self-seal pouches eliminate equipment costs; heat-seal pouches require staff training and an ongoing investment in sealer maintenance
- Factor in both the upfront purchase and long-term upkeep of a heat sealer before committing
3. Shelf Life Policy
- Confirm whether the pouch IFU supports event-related sterility or mandates expiration dating
- Build a reprocessing audit procedure that matches your facility's chosen approach
4. Inventory and Storage Capacity
- Measure the instruments being packaged
- Identify which pouch sizes are genuinely needed — not just what's been ordered historically
- Confirm available storage space before placing bulk orders
Clinical and Perioperative Selection Criteria
Once SPD has confirmed pouch compatibility and inventory fit, clinical and OR teams have their own set of requirements that affect safe instrument delivery at the point of use.
1. Material Durability
- The pouch must withstand tearing through storage, transport, and repeated handling without compromising seal integrity
- Inspect packaging condition before every use — sterility dating does not account for physical damage
2. Sterility Reliability
- Prioritize pouches with external chemical indicators that visually distinguish processed from unprocessed packaging
- This provides a fast, reliable check at point of use without opening the pouch
3. Ease of Aseptic Opening
- Poor peel-open performance increases the risk of contact contamination during instrument presentation
- Test peel consistency across pouch sizes and materials before standardizing across a department
Storage, Monitoring, and Compliance Standards
Event-Related vs. Expiration-Dated Sterility
Sterility is maintained until something happens to compromise the packaging—such as a tear, moisture exposure, broken seal, or physical damage. Per CDC guidelines, environmental factors including humidity, air movement, handling frequency, and storage location all affect contamination risk over time.
Key storage conditions:
- Store sterile packages at least 8–10 inches off the floor
- Store at least 18 inches below the ceiling or sprinkler heads (per AAMI ST79 and NFPA fire codes)
- Store at least 2 inches from outside walls
- Use closed or covered cabinets when possible
- Never store under sinks or in areas prone to moisture
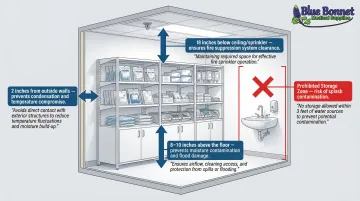
Sterile Storage Distances and Conditions
| Parameter | Requirement | Rationale |
|---|---|---|
| Floor | 8–10 inches above | Protects from floor cleaning splashes and dirt |
| Ceiling/Sprinklers | 18 inches below | Ensures fire suppression efficacy and prevents dust |
| Walls | 2 inches away | Prevents contact with wall condensation |
| Sinks | Prohibited | Prevents moisture contamination (wet packs) |
Three Types of Sterilization Monitoring
1. Mechanical Monitoring — time, temperature, and pressure readings pulled directly from the sterilizer, giving immediate feedback on whether cycle parameters were met.
2. Chemical Indicators — placed inside and outside each pack to confirm sterilant exposure. External indicators show the package went through a cycle; internal indicators verify sterilant penetration. ISO 11140 specifies performance requirements for all chemical indicator types.
3. Biological Indicators (BIs) — the gold standard, using resistant bacterial spores to directly confirm sterilization effectiveness. Per CDC guidelines, steam and low-temperature sterilizers should be monitored at least weekly. Every load containing implantable objects must include a BI, and those implants should be quarantined until results are confirmed negative.
Compliance Considerations for Distributors
Sterilization pouches are FDA-cleared Class II devices. Downstream storage and shipping must meet FDA, ISO, and GMP handling standards—which means the compliance obligation doesn't end at the sterilizer. For businesses distributing sterilization packaging products, maintaining that compliance through warehousing and fulfillment is just as critical. Bluebonnet Medical Supplies provides FDA-compliant warehousing, packing, and shipping services built specifically for sensitive medical items, helping distributors keep their products compliant from warehouse to delivery.
Frequently Asked Questions
What is sterilization packaging?
Sterilization packaging is any material system—including pouches, wraps, rigid containers, or roll stock—used to enclose medical instruments before and during sterilization, then maintain their sterility until the point of use. Sterilization pouches (peel packs) are one of the most common forms used in sterile processing departments.
How should instruments be packaged for sterilization?
Instruments must be cleaned, dried, and inspected before packaging. Place each item in the correct-sized pouch with a chemical indicator, seal per the manufacturer's IFU, and load the sterilizer on edge with adequate spacing. Hinged instruments should be open; multi-part items disassembled unless the IFU specifies otherwise.
Why is packaging important in sterile processing?
Packaging is the barrier that maintains sterility after the sterilization cycle ends. Without intact packaging, a sterilized instrument can become recontaminated during handling, transport, and storage—rendering the sterilization cycle ineffective. Packaging failure is directly linked to infection risk for patients.
What are the main methods of sterilization?
The primary methods used in healthcare settings are steam (autoclave), Ethylene Oxide (EO), and Vaporized Hydrogen Peroxide (VHP). Pouch material must match the method: paper/plastic for steam and EO; Tyvek/plastic for VHP and EO. Using the wrong pouch risks packaging failure or instrument damage.
What are the steps of sterile processing?
The core SPD workflow runs: decontamination → inspection and assembly → packaging → sterilization → storage → distribution. Packaging sits mid-cycle, meaning errors here can negate all prior cleaning work.
Can sterilization pouches be reused?
Sterilization pouches are single-use devices and must never be reused. Any pouch that has been opened or shows damage, tears, moisture, or seal failure must be discarded. Reuse introduces contamination risk and violates FDA device labeling.