Introduction
Most patients leaving the hospital with an open wound have the same thought: I have to do this myself? Wound packing isn't like changing a bandage. It means placing sterile material directly inside an open wound cavity — a procedure that feels invasive and uncomfortable the first several times you do it.
Most patients receive a nurse demonstration before discharge, yet still feel uncertain once they're on their own. How tightly should I pack? How moist should the gauze be? What level of discomfort is normal?
These are valid questions — and getting the answers right matters for healing.
This guide covers:
- When home wound packing is medically appropriate
- Supplies you'll need and how to use them
- A clear step-by-step packing process
- Factors that most affect healing outcomes
- Warning signs that require immediate medical attention
TL;DR
- Only pack a wound if your doctor has explicitly instructed you to — this technique is for deep wounds that heal from the inside out
- Gather sterile, medical-grade supplies and work on a sanitized surface with clean hands
- Pack loosely with one continuous piece of moist gauze; overpacking damages tissue
- Follow your doctor's change schedule precisely, since frequency affects healing as much as technique
- Call your doctor immediately if packing is missing, stuck, or any signs of infection appear
When Should You Pack a Wound at Home?
Wound packing isn't appropriate for every wound. Doctors prescribe it specifically for deep wounds that can't be closed with stitches or staples and must heal from the inside out — a process called secondary intention healing. Common examples include drained abscess cavities, surgical incisions left open intentionally, and deep tunneling wounds.
Even when a wound qualifies, home packing is only safe under specific conditions.
Home packing is appropriate when:
- A doctor or nurse has assessed your wound in person
- You've received a hands-on demonstration of the technique
- You have clear written instructions about supplies and schedule
- Your doctor has confirmed you can safely manage packing between clinical visits
- You're scheduled for a follow-up within 48 hours of your first packing change
⚠️ Home packing is NOT appropriate when:
- The wound is actively bleeding
- The wound has worsened rapidly since hospital discharge
- You haven't received direct instruction from a healthcare provider
- You're unsure about any step of the process
- The wound shows signs of serious infection
According to UMass Memorial Health discharge protocols, patients should be seen within 48 hours of their first home packing to confirm proper technique and monitor early healing progress.
What You Need Before Packing a Wound at Home
Essential Supplies
Gather these items before starting any wound packing procedure:
- Sterile packing gauze in the type and size your doctor specified (plain, iodoform, or antimicrobial)
- Wetting solution (typically sterile normal saline or a prescribed solution)
- Clean bowl for wetting the gauze
- Medical-grade tape to secure dressings
- Sterile outer dressings to cover the packed wound
- Non-sterile gloves for handling materials
- Cotton swabs for packing narrow wound areas
All supplies must be individually packaged, sterile, and sourced from reputable medical suppliers. Using medical-grade wound care products—not improvised household materials—is critical for infection prevention.
Important: Confirm with your doctor what specific gauze type and solution to use before purchasing. Different wound types require different materials, and using the wrong product can delay healing or cause complications.
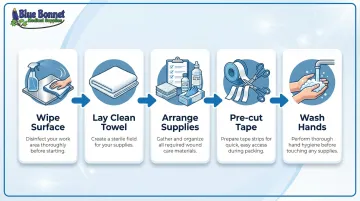
Workspace Setup
Proper preparation prevents contamination:
- Wipe down your work surface with an antimicrobial wipe and allow it to dry completely
- Lay a clean towel as your work surface
- Arrange all supplies within reach before opening any sterile packages
- Pre-cut strips of tape so they're ready when needed
- Wash your hands thoroughly with soap and water for at least 20 seconds
You'll need to wash your hands twice during the process: once before removing the old dressing and again before applying new packing.
How to Pack a Wound at Home: Step-by-Step
Step 1: Remove the Old Dressing and Packing
Gently loosen the outer dressing first, then carefully pull out the old packing material. Pay attention to whether you can locate all the packing—if you cannot find the packing inside the wound when removing it, stop immediately and call your doctor. Retained packing is a medical emergency that can cause infection and requires professional removal.
Seal used materials in a plastic bag for disposal, then wash your hands again before moving to the next step.
Step 2: Prepare the New Packing Material
Pour your prescribed wetting solution (sterile saline or doctor-specified solution) into the clean bowl. Soak the appropriate length of packing gauze in the solution, then remove and gently squeeze out excess liquid.
The correct texture is moist but not dripping — this balance matters more than most people expect:
- Overly wet gauze causes wound edge maceration (tissue breakdown)
- Dry gauze sticks to healing tissue and tears away during removal, causing pain and slowing recovery
Step 3: Pack the Wound
Fill the wound cavity with moistened gauze using one continuous piece — never pack with multiple separate pieces. Use your fingers or a cotton swab to gently press material into narrow or deep areas.
The gauze should fill the space without compressing the wound walls — loose, not tight. Clinical standards require filling the cavity completely to skin level without mounding or stretching tissue. For very deep wounds, tape the free end of the gauze to the skin outside the wound so it can be fully located and removed at the next change.
Mild discomfort during packing is normal. Sharp or significant pain means you need to ease up or contact your provider.
Step 4: Apply the Outer Dressing
Place a sterile outer dressing over the packed wound and secure it firmly with medical tape to protect against contamination.
If the outer dressing isn't waterproof, cover it with plastic wrap and tape the edges to protect it during activities involving water. Wash hands thoroughly when finished and dispose of all used materials properly.
Key Factors That Affect Wound Healing During Packing
Wound packing outcomes depend heavily on a few controllable variables. Getting these right is as important as following the steps themselves.
Gauze Moisture Level
Moist wound environments accelerate healing by enhancing epithelial cell migration and supporting collagen synthesis. The target is consistently moist—not soaking wet, not dry. Dry gauze damages new granulation tissue on removal; overly wet gauze macerates wound edges and slows healing.
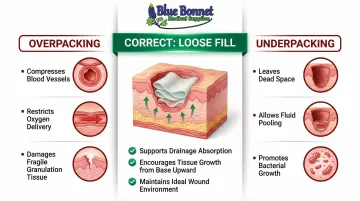
Packing Tightness
Proper tension makes the difference between healing and harm:
- Overpacking compresses blood vessels, restricts oxygen delivery, and physically damages fragile new tissue growing from the wound base
- Underpacking leaves dead space where fluid pools and bacteria proliferate, leading to abscess formation
The clinical standard is to fill the cavity completely but loosely, allowing drainage to be absorbed while supporting tissue growth from the base upward.
Change Frequency
Typical schedules call for packing changes once or twice daily, but your doctor's specific instructions take precedence. Changing too infrequently allows bacterial buildup; changing too often disrupts fragile new tissue forming between changes. As the wound heals and produces less drainage, your doctor may adjust the frequency.
Common Mistakes When Packing a Wound at Home
Most wound packing errors come down to pressure, moisture, and contamination. Here are the four that cause the most harm:
Packing Too Tightly
This is the most common and damaging mistake. Excess pressure compresses capillaries, restricts drainage, and physically damages the fragile granulation tissue that fills the wound from the inside out. Overpacking causes pain, impairs blood flow, and delays healing. Snug contact is the goal — not compression.
Using Dry Gauze or the Wrong Solution
Gauze that's too dry adheres to healing tissue and tears it away on removal, causing pain and setting back recovery. Use only the solution your doctor prescribed — not tap water, not alcohol. Alcohol exposure adversely affects the inflammatory response and impairs wound healing.
Skipping or Rushing Hand Hygiene
Open wounds are highly susceptible to infection. Contaminated hands during dressing changes introduce bacteria directly into vulnerable tissue. Wash thoroughly before and after every step — no shortcuts.
Using Multiple Separate Gauze Pieces
Fragmented packing creates a serious risk of leaving material behind in the wound. Retained gauze can cause chronic infection, non-healing wounds, and sepsis. Always use one continuous piece. If more than one piece is necessary, tie them together securely with the knot visible in the main cavity.
Even with careful technique, complications can still develop — knowing the warning signs helps you act quickly.
Warning Signs That Require Immediate Medical Contact
Contact your doctor or seek emergency care if you notice:
- Fever above 100.4°F (38°C) or chills - signals possible systemic infection
- Increased pain, swelling, warmth, or redness around the wound
- Pus or increased drainage from the site
- Red streaks extending outward from the wound
- Tissue color change - wound tissue turning white, yellow, or black
- Foul odor from the wound
- Packing that cannot be found on removal
- Wound increasing in size or depth instead of healing

When in doubt, call your doctor — early intervention prevents minor complications from becoming serious ones.
Frequently Asked Questions
How does a wound heal with packing?
Packing keeps the wound open so it heals from the bottom and sides inward (secondary intention healing). This prevents the skin surface from closing before underlying tissue fills in, which would trap infection inside.
How long should wound packing stay in?
Your doctor will typically direct you to change packing once or twice daily, depending on wound type and drainage. As healing progresses and drainage decreases, change frequency may be reduced — follow your provider's instructions on timing.
How painful is repacking a wound?
Mild discomfort and sensitivity during changes is normal. If packing has dried and stuck to the wound, soak it with sterile saline before removal to reduce pain. Severe or worsening pain requires consultation with your provider.
What is medical packing?
Wound packing means filling an open wound cavity with sterile gauze to absorb drainage and prevent the surface from closing too early. This allows the wound to heal from the inside out rather than trapping tissue — or infection — beneath the skin.
What supplies do you need to pack a wound at home?
You'll need:
- Sterile packing gauze (type specified by your doctor)
- Sterile saline or prescribed wound solution
- Clean bowl for soaking gauze
- Medical gloves
- Outer sterile dressings and medical tape
- Cotton swabs for narrow wound openings
When should you go to the emergency room instead of packing a wound at home?
Seek emergency care for active significant bleeding, signs of serious infection (high fever, confusion, rapidly spreading redness), packing that cannot be located in the wound, or any wound that has visibly worsened since the last change.